

Gauges and Instrumentation for Fracture Mechanics Testing
are no longer being produced.
Limited quantities of inventoried gauges will be sold.
Contact DonaldGeorgi@gmail.com
for further information.
| Home | Gauges | Instrumentation | Ordering Information |
 |
Airframe failures of WW I
aircraft drew attention to cracks such as that which the The
Red Baron noted in the lower wing of his Albatross D.III,
initiating its grounding and update. (see Albatross photo*
to the left). After the war, pioneers such as Griffith**
with information from prior work done by
Inglis, led to a quantitative connection between fracture
stress and flaw size. This created the dawn of quantitative
fracture mechanics which has contributed to the astonishing
reliability of twenty-first century aircraft which, for
example, safely ferried 18,274,647 passengers to and from
the U.S.A. in the month of December 2016.***
As aircraft materials moved to
composites, crack testing has continued to be of fundamental
concern. Although the connection of fracture mechanics with aircraft remains strong to this day, the field is a basic consideration for many materials and structures used in medical, construction and other transportation. |
| Return to Top |
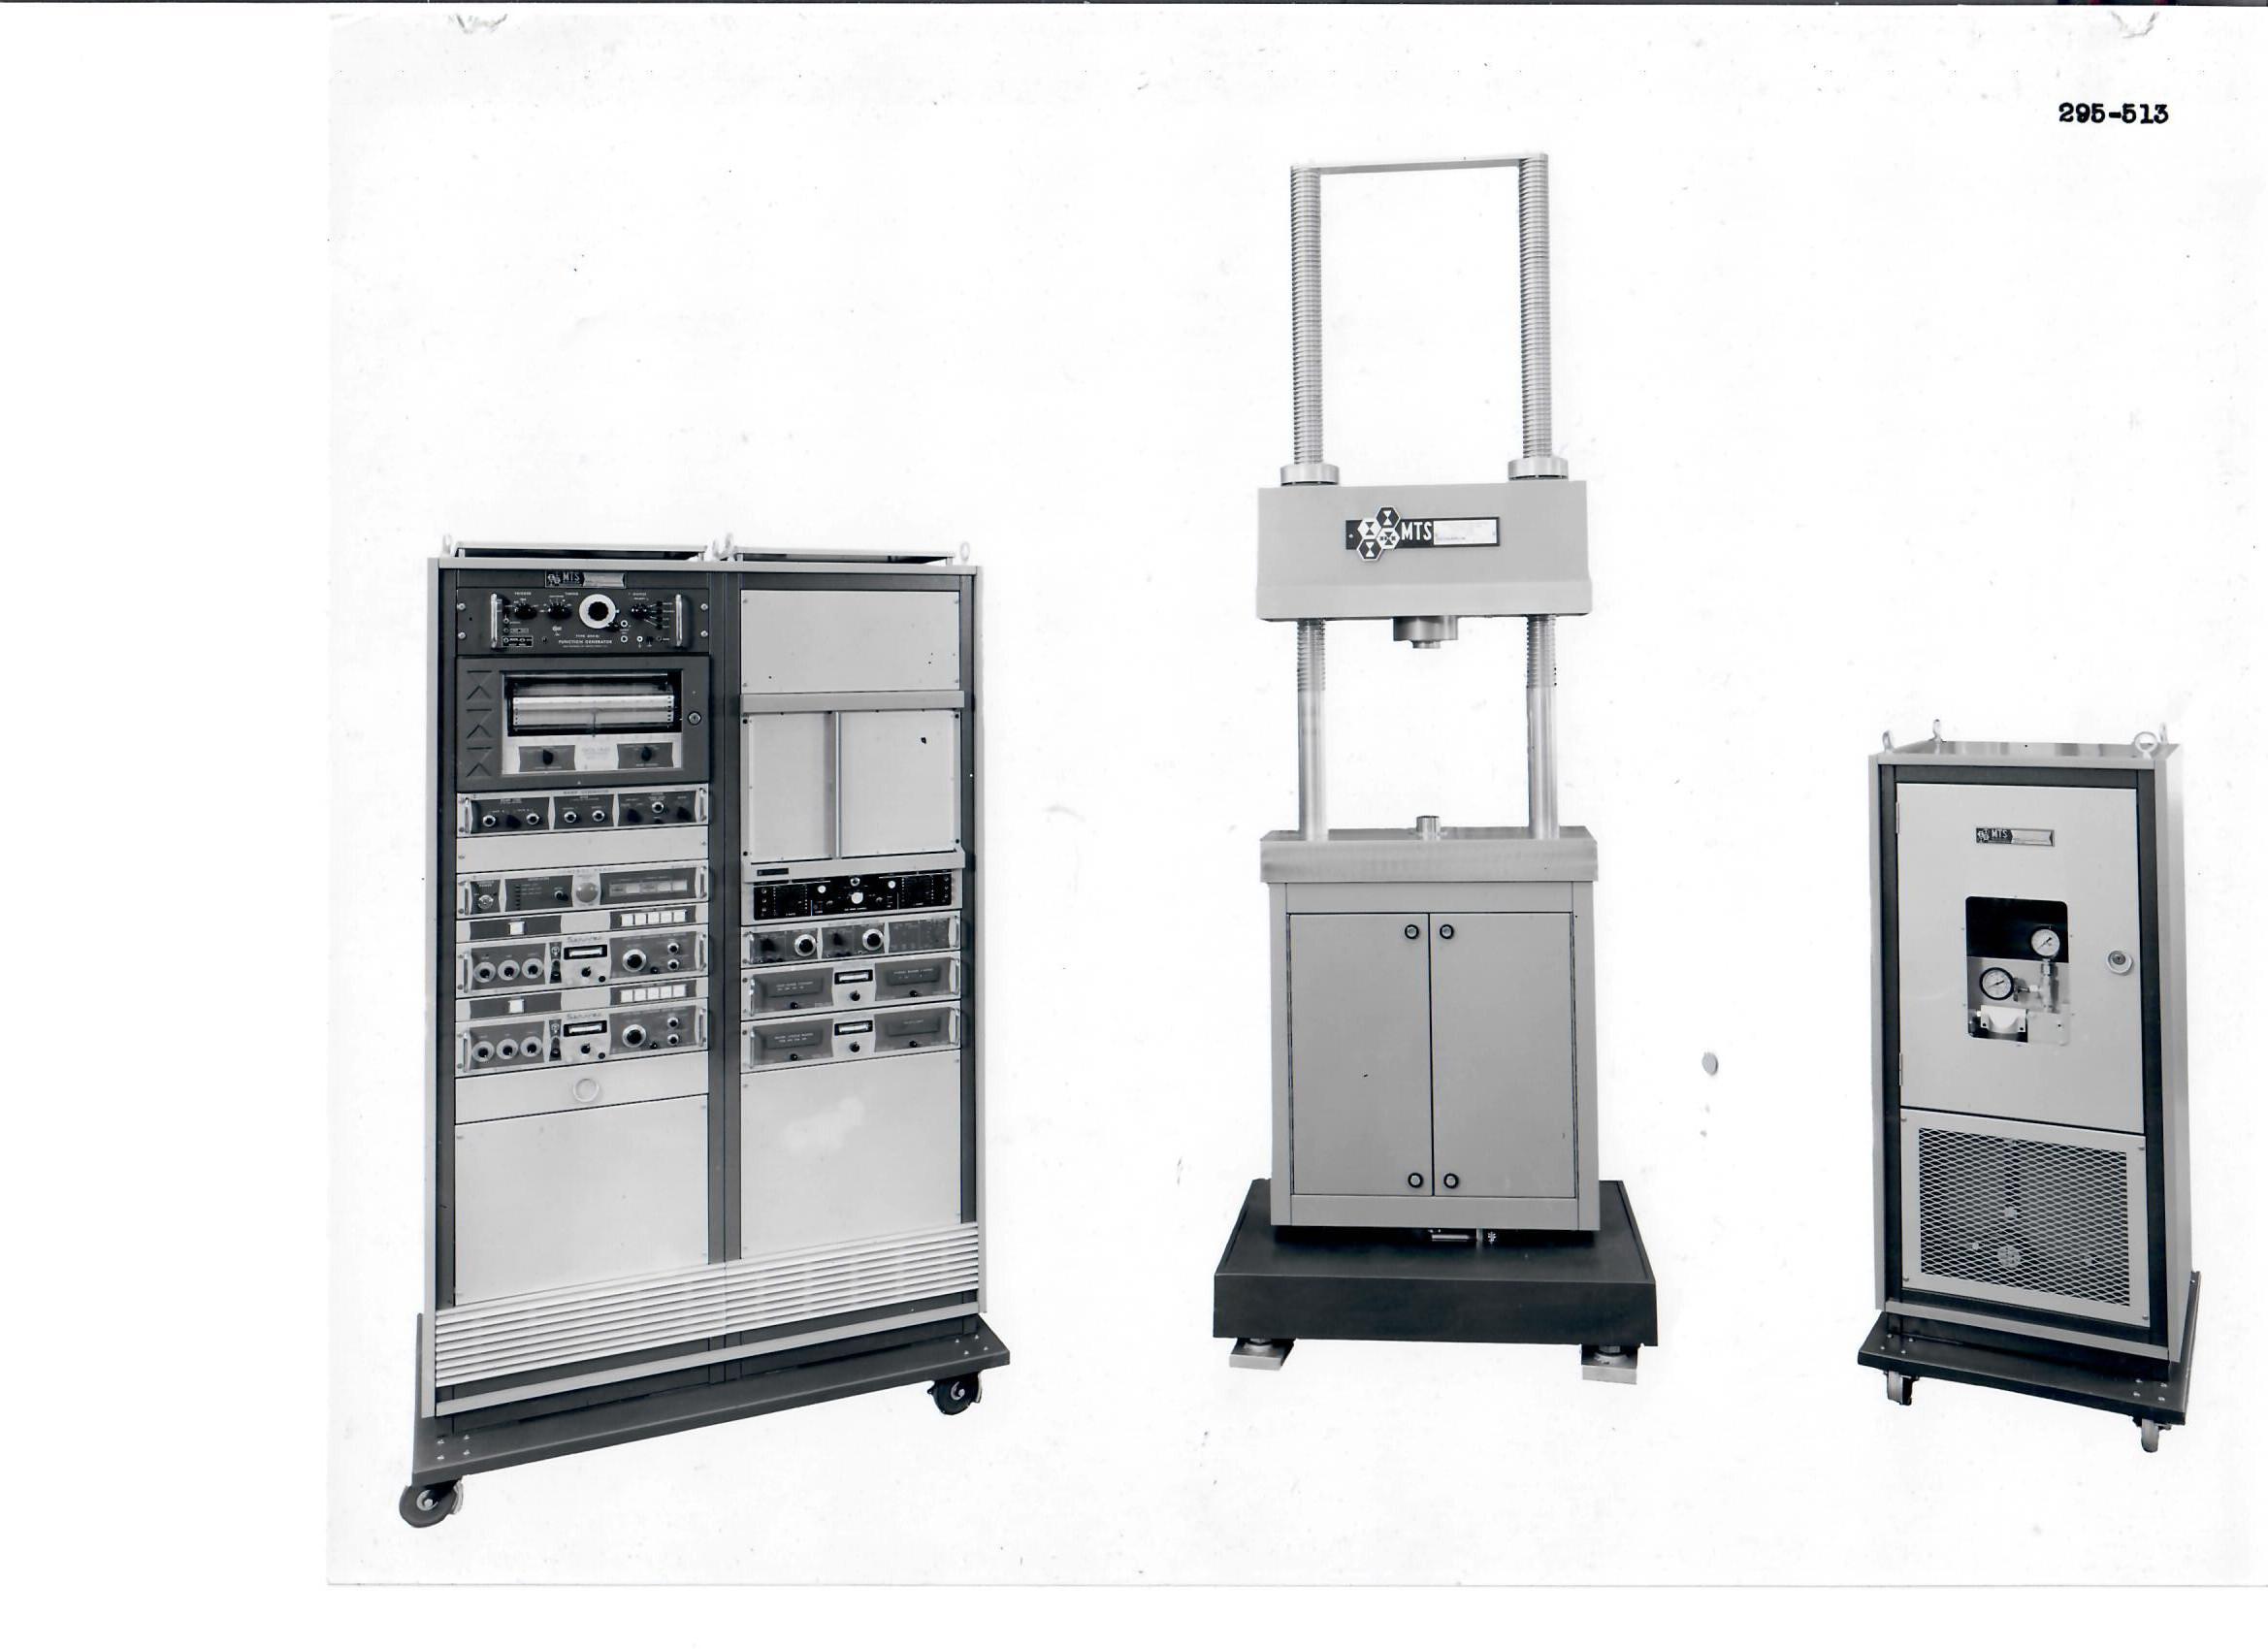 By the 1960's programmable,
servo hydraulic and resonant electrical equipment allowed
sophisticated laboratory testing to mate fracture mechanics
theory with practice. The photo is of a Research
Incorporated - MTS Division test machine of the 1960's. (The
division was to become independent as MTS Systems
Corporation in 1965.) By the 1960's programmable,
servo hydraulic and resonant electrical equipment allowed
sophisticated laboratory testing to mate fracture mechanics
theory with practice. The photo is of a Research
Incorporated - MTS Division test machine of the 1960's. (The
division was to become independent as MTS Systems
Corporation in 1965.) |
One of the test machine
pioneers,Max Russenberger, invented and patented the Low
Resistance Insulated Crack gauge (U.S. Patent No.
4,149,406) which was based on the technology of the then
available foil strain gauge. Russenberger and an associate
from Amsler days, Hans Rudolph "Rudy" Hartman, built a
standard range of crack gauge sizes for sale in the U.S.A.
Gauges were constructed by
Russell Smith of Lawson Hall Laboratories through 2008.
Hartman sold many sizes of KRAK GAGE and Fractomat
Conditioner through his company, Hartrun Corporation
up to the early 2000's at which time he transferred
exclusive ownership of Hartrun and the KRAK GAGE sales to
Bob Churchill. In 2009, Teksym Corporation began
production of the standard Krak Gages for Hartrun plus new
gauge configurations designed for composite materials and
structures testing. In 2014, Bob Churchill passed away but
left no provision for continuation of the KRAK GAGE or
Fractomat. Neither Churchill or other people associated
with the manufacture or use of the Fractomat were
interested in providing continuation of the Hartrun
business or products. Teksym Corporation having used only
internal resources for producing the gauges, decided to
continue offering them directly to the marketplace
under the name Crack Gauge. ****
|
| Return to Top |
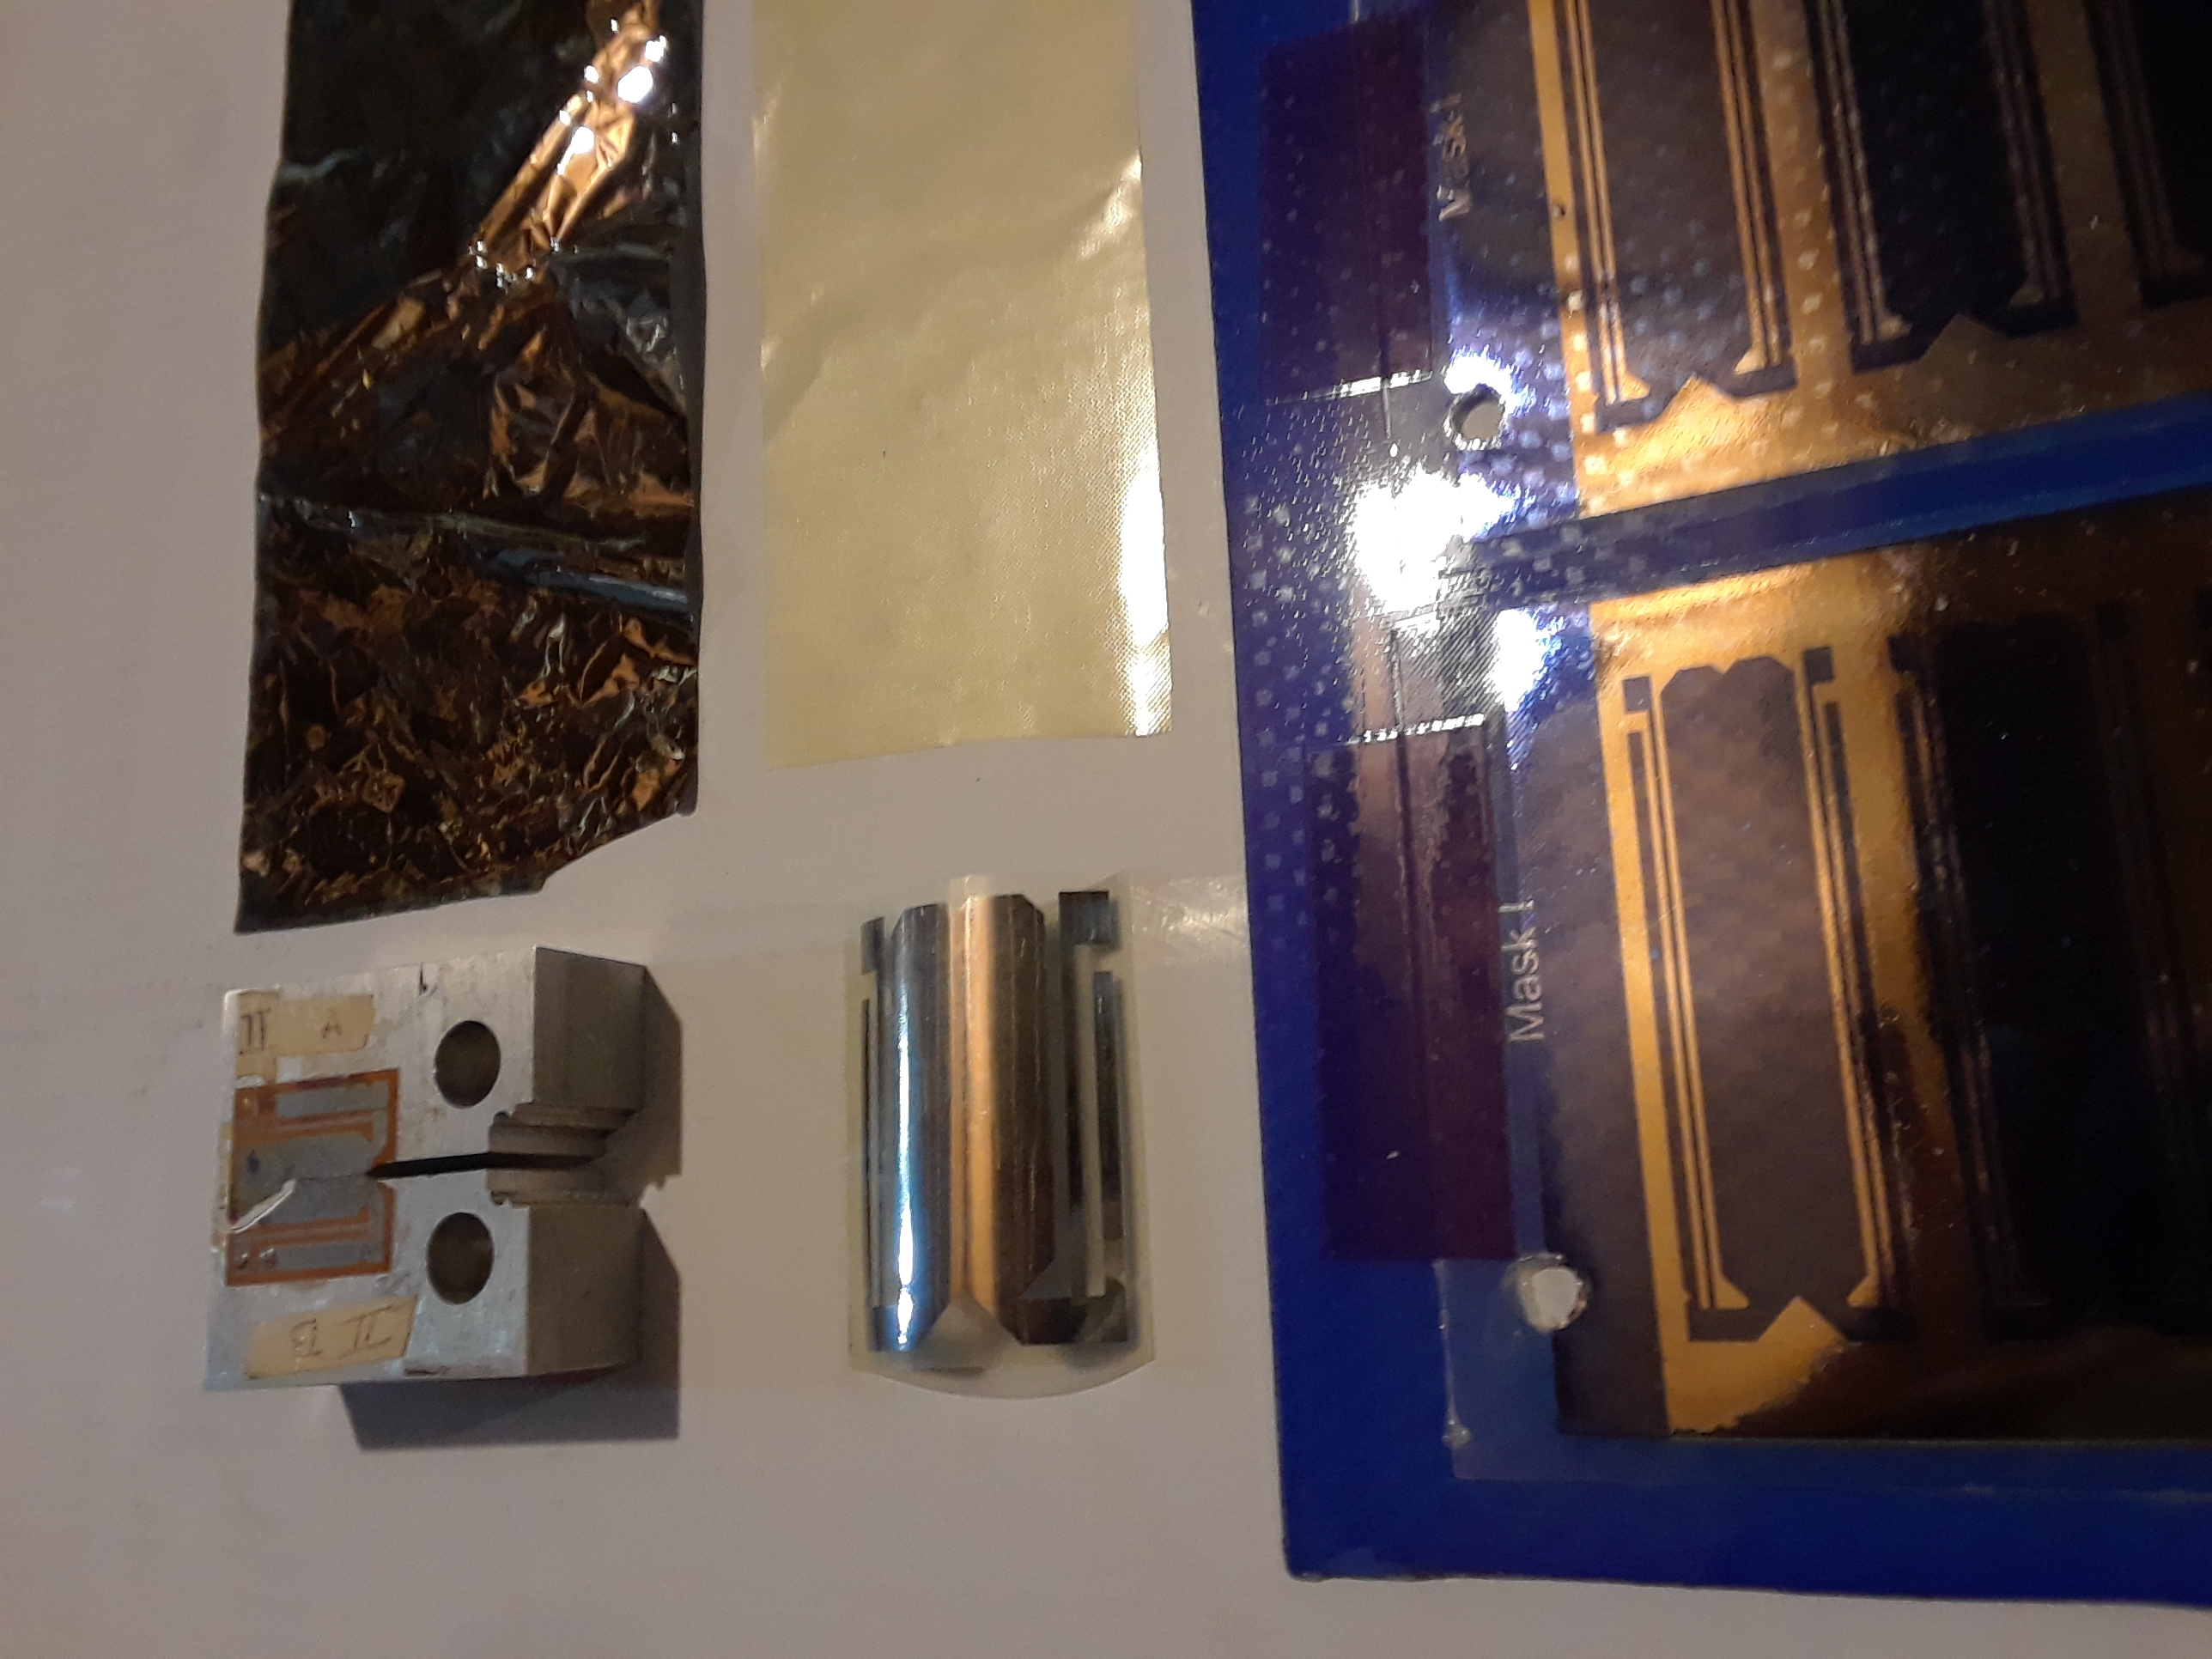
In the upper left of this photo is a strip of constantan foil, chosen for its ability to be rolled to very thin sheets 0.0002 inches thick (0.005 mm.) Constantan exhibits very low resistance and dimensional variation with temperature. |
To
the right of the foil is a backing consisting of a 'B
stage' epoxy with or without embedded glass fibers. (B stage
material is partially cured before final assembly and then
with heat and pressure finally cured, bonding the foil to the
epoxy in a brittle crystalline state.)
Farther
to the right is shown the material as it is photochemically
etched to achieve repeatable gauge dimensions which provide
repeatable gauge resistance change when subjected to a crack.
The
lower center left shows a completed crack gauge ready to be
cemented to a specimen.
The
far lower left shows a specimen prepared with a crack gauge
bonded to a specimen so that fatigue cycling will cause the
crack to progress down the center of the gauge. A constant
electrical current flows through the gauge which results in a
longer path due to the increasing crack length. The resulting
voltage, produced by the increasing resistance, is
proportional to crack length.
|
| Return to Top |
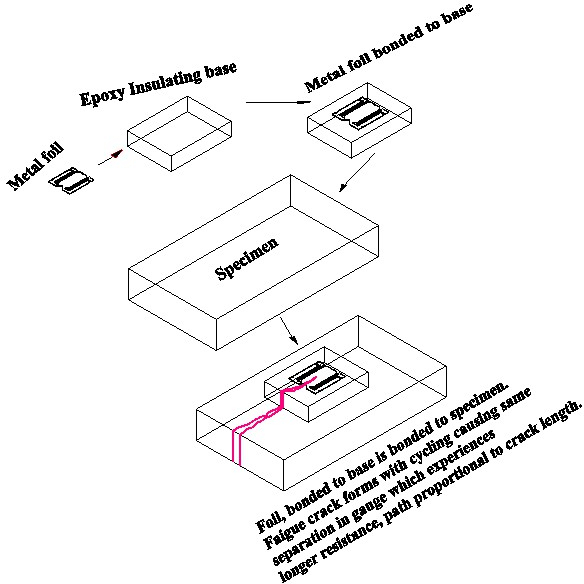
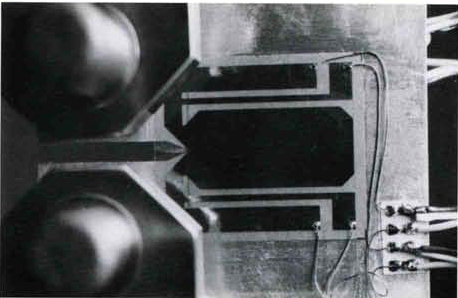 |
After
the foil is bonded to the base, it is glued to the specimen.
Wires are attached to the gauge and then connected back to a
Conditioner.
The
specimen is placed in a fatigue test machine and subjected
to programmed cyclic loading.
At
the highest stress concentration point, a crack forms and
grows longer with progressive cycles. The performance of
the material under controlled stress and cycling allows
numerical fracture toughness evaluation of the material.
|
| Return to Top |
 |
The
gauge is classified as a (1) Low resistance, (2) Insulated (3)
crack (4) gauge because of its design. The foil is made a thin
as possible first to not interfere with the cracking
properties of the specimen and secondly to provide as much
resistance change with change in crack length as possible.
Despite the very thin thickness of constantan foil, the gauge
resistance varies between less than 1 ohm to at best less than
20 ohms, and usually less than 2 ohms.
The insulated feature comes from the
bonding of the foil on the insulated epoxy base. This
feature is desirable in the case of conductive metal
specimens, and provides a convenient bonding method for
either conductive or insulated specimens. There have been
cases where the foil is directly bonded to a conductive
specimen with special adhesive such as a very high
temperature ceramic cement. In this case, sufficient
adhesive must be uniformly placed to insure isolation of the
gauge from the conductive specimen. In cases where the
specimen is non conductive such as composite, ceramic, or
plastic a gauge could be directly bonded to the specimen.
Even with composite gauges the standard crack gauge
with
|
| Return to Top |
|
More detailed explanation: As the specimen develops a crack, the foil and insulating base of the gauge which is bonded to the specimen, experience a separation equal to that of the crack. The electrical current passes from Tab A, through R1, R3, R4,R5,R6,R7 and R9 to Tab D. The insulating base of the gauge which is bonded to the specimen, experiences a separation equal to that of the crack in the specimen. The foil, bonded to the base experiences the same crack. Current flowing to the center of the foil must traverse an increasingly longer path to get around the end of the crack. The path represented by R4, R5 and R6 will linearly increase as that path gets longer so that constant current I times those increasing resistances will produce an increasing voltage proportional to the crack length (E=IR.) At the intersections of R1 to R3 and R7 to R9, Tabs B and C allow sensing of the voltage developed across R3-R4-R5-R6 and R7. As the crack develops, R4 and R6 become longer, increasing their resistance linearly with crack length. R5 reduces in width, causing it to also increase resistance with crack length, but because the shrinking width affects the resistance in its denominator, it contributes an exponential rise in resistance, which is small as long as the final crack length is not too close to the gauge length. Tabs B and C are connected to the very high input impedance of an instrumentation amplifier, so the resistances R2 and R8 become inconsequential because the current through them is so small. The voltage at Tabs B to C becomes the signal proportional to crack length. R3 and R7 do not change as they are only due to the distance between the voltage tab and the active R4/R6 resistors. The crack sensing voltage produced from a constant current allows uncontrolled resistances of gauge elements, connecting wires and termination resistances to become "don't - care" components of the system. |
| Return to Top |
What instrumentation accesses the crack resistance?
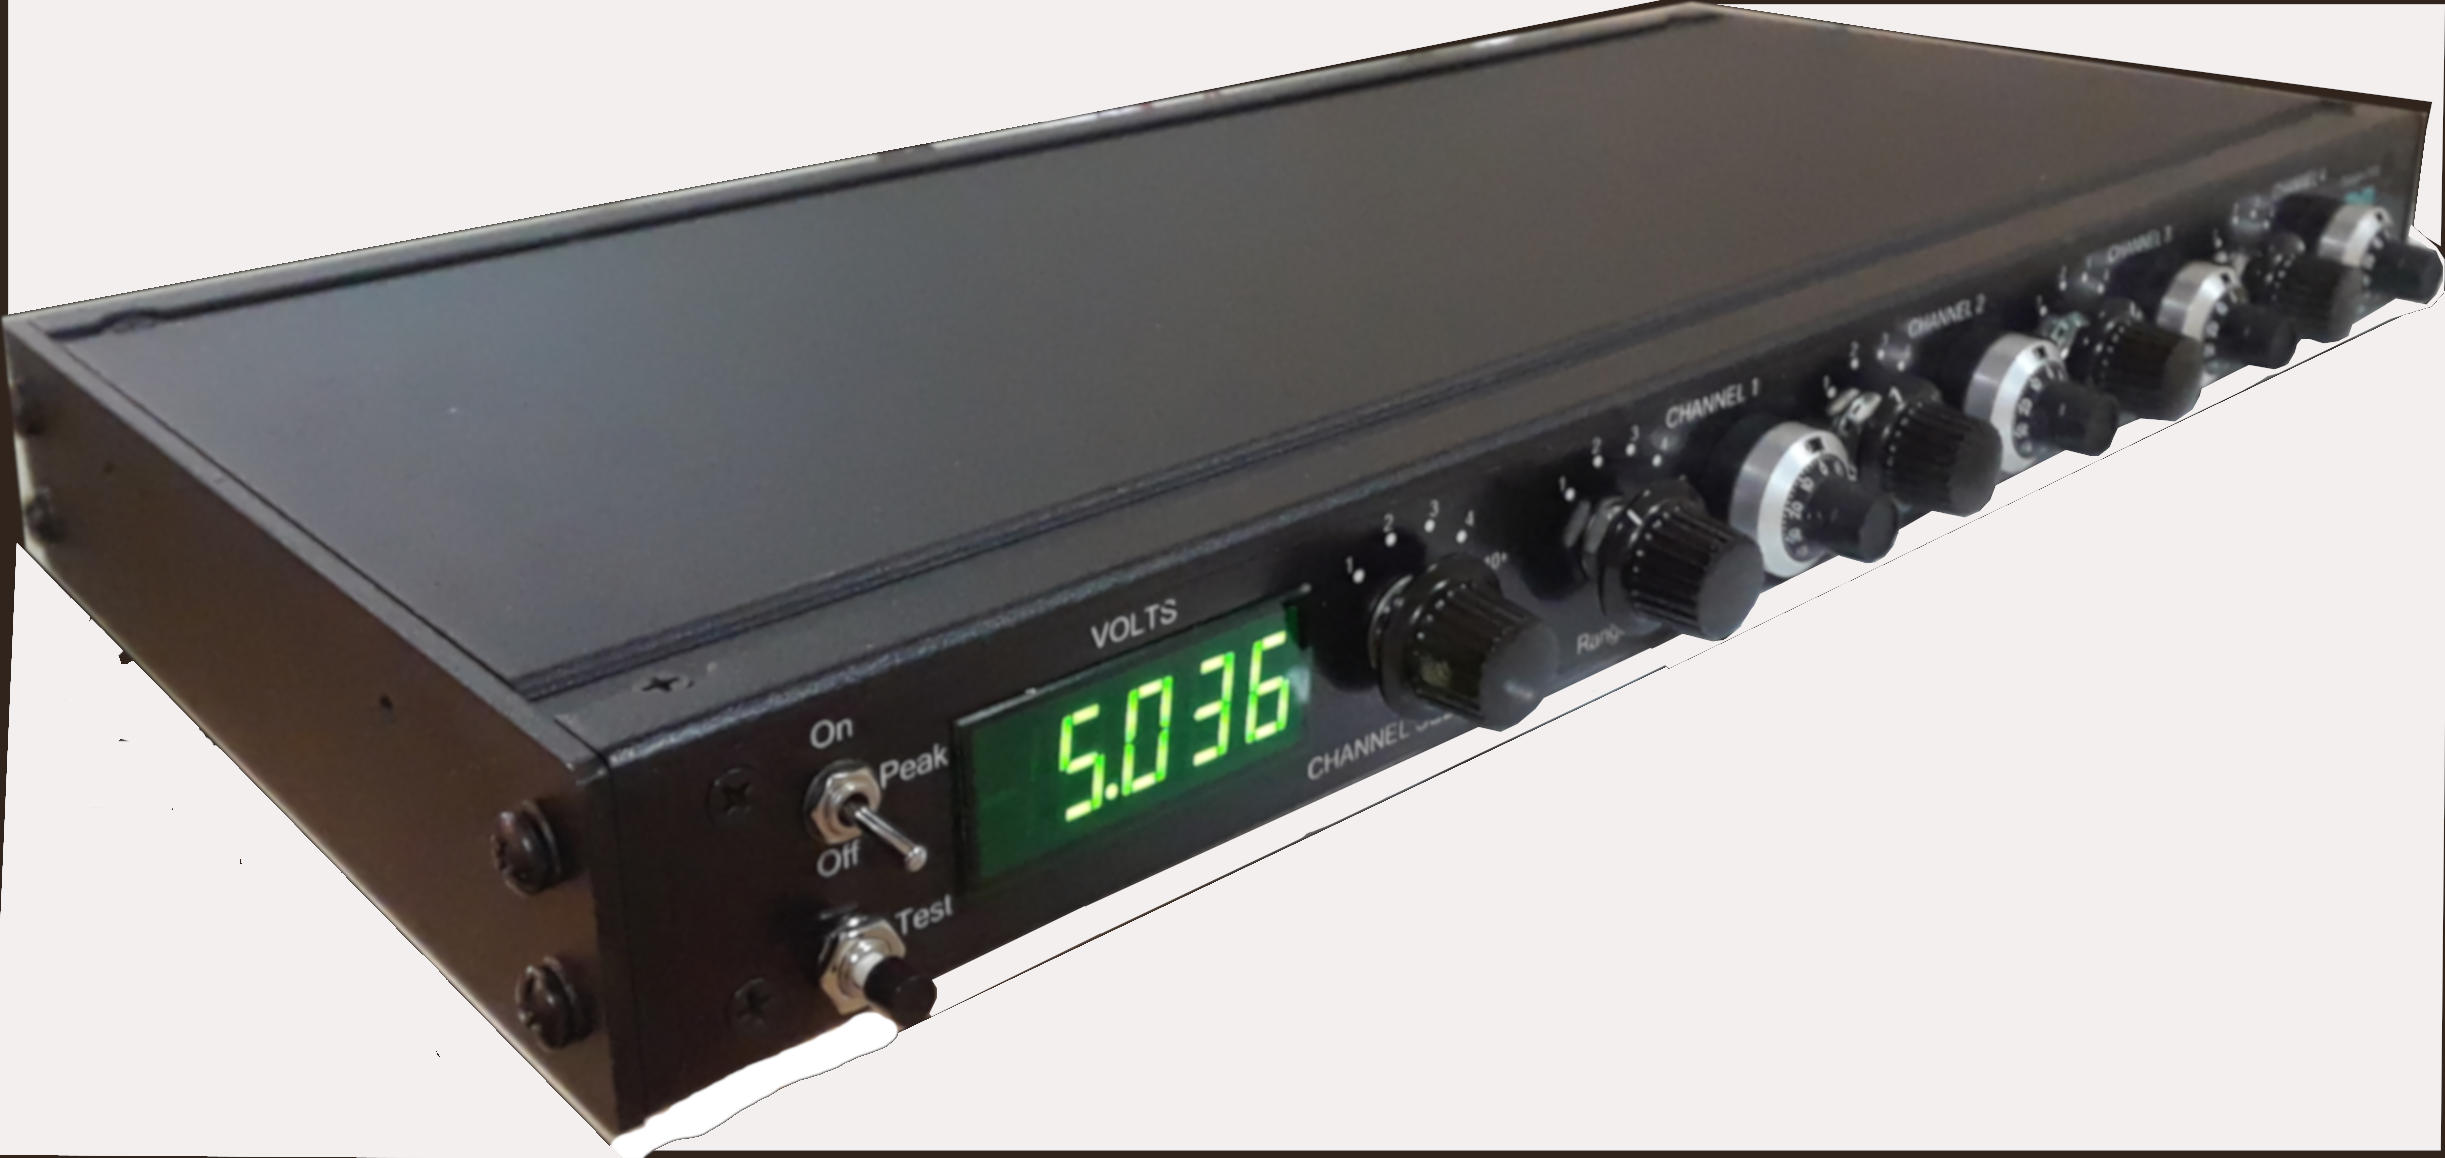 |
Rather than use constant voltage
excitation as found in many passive transducer conditioners, the
very low resistance of the crack gauge is best conditioned with a
constant current. As the crack resistance increases the voltage
linearly follows the crack length. Amplification allows for
scaling of the voltage and of sufficient amplitude to be connected
to a data acquisition system or test machine controller. The
conditioner in the photo has provisions for simultaneously
processing four gauges. Earlier conditioners relied on the precision of the dimensions of gauges to setup gain and offset voltages. As new gauge sizes were added the proper setups required had to be added by modifying the conditioners. The Teksym Power Interface has a continuous amplification range so that any present ad most future gauge configurations can be simply accommodated with a single setting of the channel span adjustment. |
|
A gauge calibrator for each gauge size is connected to the input of any of the four conditioner channels. The calibrator consists of a real gauge, with 0 mm crack, adjusted to the median value of all 30 mm gauges. Setting the range and span so that the display shows the factory preset number for a 30 mm gauge, the gain for the channel is properly set so that the displayed 'zero' voltage is the value to be sent to the Data Acquisition input, and 10.00 volts will be the 100% (30 mm crack length.) Calibration is now complete and the conditioner is connected to the test gauge. Setup for the gauge to be
used for the test consists of:
1. Connecting the
gauge
2. Set the range and
span controls so that the display is the factory set
value.
3. Set the Data
Acquision enginering units so that 0 mm is the factory set
value.
4. Set the Data
Acqisition engineering units so that 100 % crack length.
5. Begin the test.
As long as the Power
Interface remains in calibration, the gague calibrator is
not needed. Only the 5 step setup is needed.
The 'zero' conditioner voltage setting is a significant voltage generated with a new gauge with 0% crack because the gauge pattern has a significant initial value. No zero offset is needed for the output signal. It is handled completely by the data acquisition system. |
| Return to Top |
|
Mail:
Teksym Corporation 1261 Town Line Road Maple Plain, MN 55359
e mail:
Staff@teksym.com
Website:
www.Teksym.com
Phone:
1-763-479-6190. If the call is directed to voicemail,
leave your name, phone number, time zone and preferred
time of return call.
|
|
* " Albatross
D. III,"WikipediA 2018
** "Early
Fracture Research," Chapter 1.2.2, Fracture
Mechanics Fundamentals, T.L. Anderson,
*** "U.S.
International Air Passenger and Freight
Statistics," P. 4, U.S. Department of
Transportation
**** Personal
experience of founder
|
| Return to Top |